Kalau anda ingin merayakan pesta halloween sendiri di rumah coba ikuti tips belanja untuk pesta halloween di bawah ini
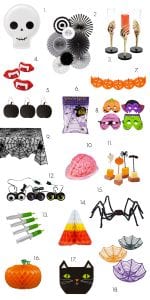 1.
1. These adorable skull plates will not only decorate your table, but they'll also hold your spider-shaped appetizers as well.
2. Party fans are a quick way to make the perfect photo booth or dessert table backdrop. Just open and pin in place!
3. How about serving your Bloody Marys in one of these amazingly creepy glasses.
4. Wax lips (with vampire teeth!) are a must have for a photo booth prop.
5. Label your tasty confections with these cute mini pumpkin chalkboards.
6. The spider web-in-a-bag is a classic Halloween decoration that never goes out of style—perfect for a haunted entryway!
7. Hanging garlands is another easy way to add some color and texture to the party without a lot of effort.
8. In case your gang isn't the "full costume type", providing a few masks will give off a spooky vibe with minimal dress-up effort.
9. Make your tablescape scream Halloween vibes with this lace spiderweb tablecloth.
10. For the especially daring, try your hand at a ghoulish dessert with a jello brain mold!
11. Even your cheese tray can get into the spirit of things with these toothpicks.
12. These flashing light-up eyes would be perfect entangled in some spiderwebs in a dark corner (or maybe just peeking out of the chip bowl).
13. While I'm a fan of the classic "jello shot in the test tube" for a Halloween party, try something new by serving them in a syringe instead!
14. What's not to love about a giant candy corn?!
15. Were you thinking your party didn't need a 4 foot wide spider with eyes that glow?? Think again!
16. Honeycomb decorations are a great way to add some 3D color and texture to your party decor (assembly is so easy too!).
17. This black cat napkin can cross my path any day of the week—meow!
18. Spider web bowls are perfect for chips and popcorn (or fill them with fun sized Kit Kats please!).
Looks like all the ingredients for a great party if you ask me! While there's still plenty of time left to find the perfect creepy and cute additions for your big
Source Article :
abeautifulmess.com/2016/10/halloween-party-shopping-guide.html [ ... ]


 For this craft, you will need the following supplies:
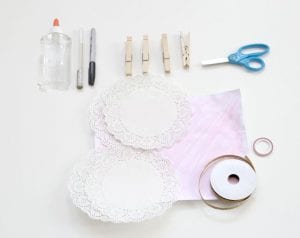 Scissors
Craft paper or decorated card stock
Doilies (one for each letter)
Pens for lettering or alphabet stamps
Craft glue
Clothespins
Washi tape
Ribbon
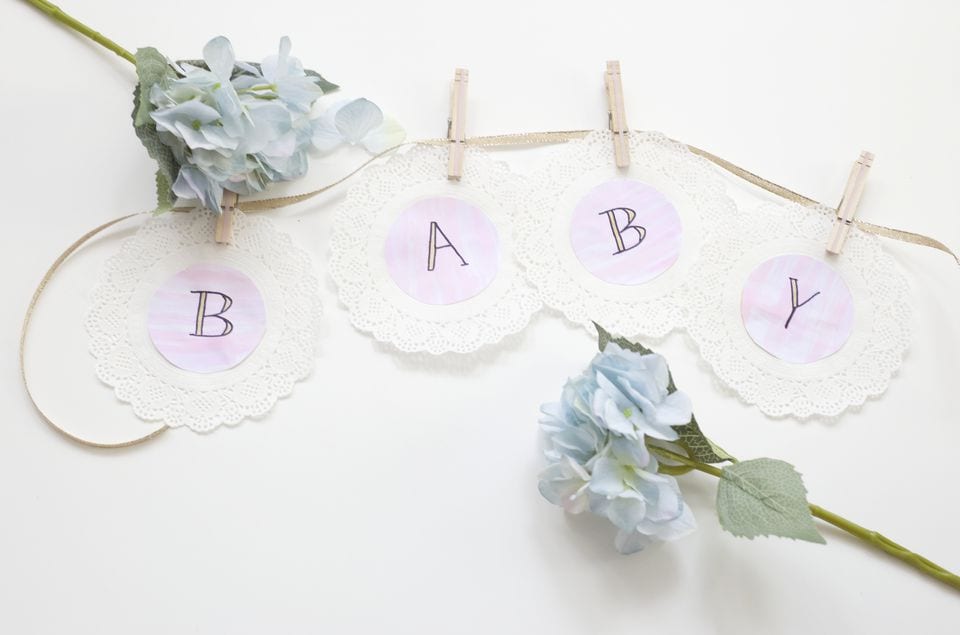
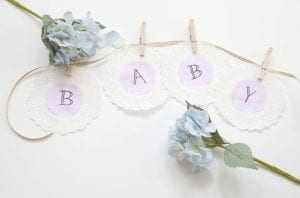
Your banner can simply read “Baby,” or perhaps you want to try a phrase such as “It’s a Girl!” or “It’s a Boy!” Now is the time to figure out just what your banner should say.
If you are making the banner for a friend and you know the baby’s sex, feel free to use colors to fit the baby shower. You can use pre-decorated craft paper or make your own with card stock and watercolor paints.
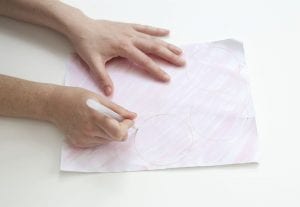
You will need one doily and one circle of card stock per letter. The circles you draw should measure to fit the inside of the doily. For the doilies featured in this project, the circles had a diameter of 3-1/2 inches.
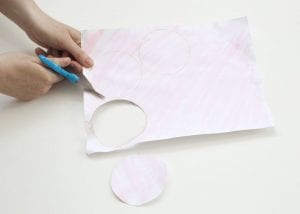
Use scissors to cut out the circles of your craft paper or decorated card stock. For our decorated paper, we used watercolors to paint the background.
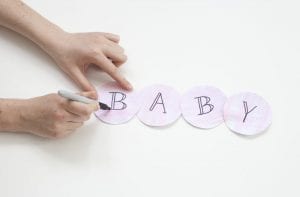
If you are good at calligraphy, now is the time to show off your fancy letter work! Use a pen or marker in a bold or contrasting color to write one letter on each of your circles. For our banner, we wrote the letters by hand without a stencil.
If you’re letter work needs assistance: Use a computer to find a font you feel comfortable tracing and print out the letters. Having a guide will help you achieve the look of a stamp or professional quality.
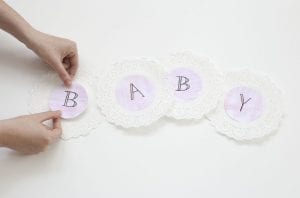
Once your craft paper circles have been lettered, use glue (white, clear, or a glue-stick) to adhere them to the center of your doily. Allow to dry.
Tip: Use a thin layer of glue so that the delicate doily paper doesn’t get saturated and tear.
Do you want to hang your banner in a doorway, over a fireplace mantel, on a wall, or in a nursery? The length of the ribbon you use to hang your banner will depend on where you want it to go. Cut your ribbon accordingly.
You will need to use one clothespin per letter to attach your doilies to the ribbon. If you want to add something extra to your banner, feel free to decorate the clothespins. We recommend using washi tape or acrylic paint to add another pop of color, or a strip of lace to achieve a sweet-as-can-be look. It can be as subtle or bold as you want!
Scissors
Craft paper or decorated card stock
Doilies (one for each letter)
Pens for lettering or alphabet stamps
Craft glue
Clothespins
Washi tape
Ribbon
Your banner can simply read “Baby,” or perhaps you want to try a phrase such as “It’s a Girl!” or “It’s a Boy!” Now is the time to figure out just what your banner should say.
If you are making the banner for a friend and you know the baby’s sex, feel free to use colors to fit the baby shower. You can use pre-decorated craft paper or make your own with card stock and watercolor paints.
You will need one doily and one circle of card stock per letter. The circles you draw should measure to fit the inside of the doily. For the doilies featured in this project, the circles had a diameter of 3-1/2 inches.
Use scissors to cut out the circles of your craft paper or decorated card stock. For our decorated paper, we used watercolors to paint the background.
If you are good at calligraphy, now is the time to show off your fancy letter work! Use a pen or marker in a bold or contrasting color to write one letter on each of your circles. For our banner, we wrote the letters by hand without a stencil.
If you’re letter work needs assistance: Use a computer to find a font you feel comfortable tracing and print out the letters. Having a guide will help you achieve the look of a stamp or professional quality.
Once your craft paper circles have been lettered, use glue (white, clear, or a glue-stick) to adhere them to the center of your doily. Allow to dry.
Tip: Use a thin layer of glue so that the delicate doily paper doesn’t get saturated and tear.
Do you want to hang your banner in a doorway, over a fireplace mantel, on a wall, or in a nursery? The length of the ribbon you use to hang your banner will depend on where you want it to go. Cut your ribbon accordingly.
You will need to use one clothespin per letter to attach your doilies to the ribbon. If you want to add something extra to your banner, feel free to decorate the clothespins. We recommend using washi tape or acrylic paint to add another pop of color, or a strip of lace to achieve a sweet-as-can-be look. It can be as subtle or bold as you want!
 Source Article : https://www.thesprucecrafts.com/diy-baby-shower-banner-4169501
[ ... ]
Source Article : https://www.thesprucecrafts.com/diy-baby-shower-banner-4169501
[ ... ] 
 This materials list contains affiliate links for products I recommend.
•Plastic Trick or Treat Pumpkin
•Rope
•Tan Yarn
This materials list contains affiliate links for products I recommend.
•Plastic Trick or Treat Pumpkin
•Rope
•Tan Yarn •Light Colored Duct Tape
•Masking Tape
•Black Top Hat
•Light Colored Duct Tape
•Masking Tape
•Black Top Hat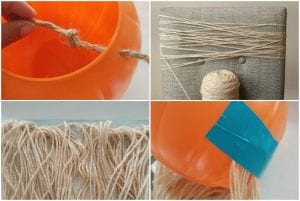 Next, unwind the spool of yarn around a chair back several times. Pull it off and cut only one end.
Lay out a piece of duct tape about 10” long. Lay the looped end of the yarn onto the duct tape.
Next, unwind the spool of yarn around a chair back several times. Pull it off and cut only one end.
Lay out a piece of duct tape about 10” long. Lay the looped end of the yarn onto the duct tape.
 Tape it around the mid-section of the pumpkin.
Repeat these steps and do the other side.
Tape it around the mid-section of the pumpkin.
Repeat these steps and do the other side.
 Note: I happen to have blue duct tape, so that’s what I used. I would recommend choosing a light colored duct tape so that it doesn’t show through the yarn.
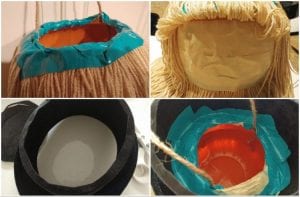
Repeat the steps above again, but in shorter strips of duct tape. This time, tape them around the rim of the pail.
Note: I happen to have blue duct tape, so that’s what I used. I would recommend choosing a light colored duct tape so that it doesn’t show through the yarn.
Repeat the steps above again, but in shorter strips of duct tape. This time, tape them around the rim of the pail.
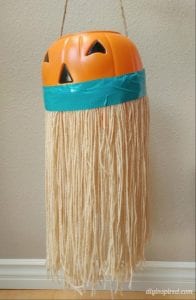
 Next, lift up the first layer and cover the face with masking tape. This will help hide the face behind the yarn. For mine, I also covered the blue duct tape with masking tape.
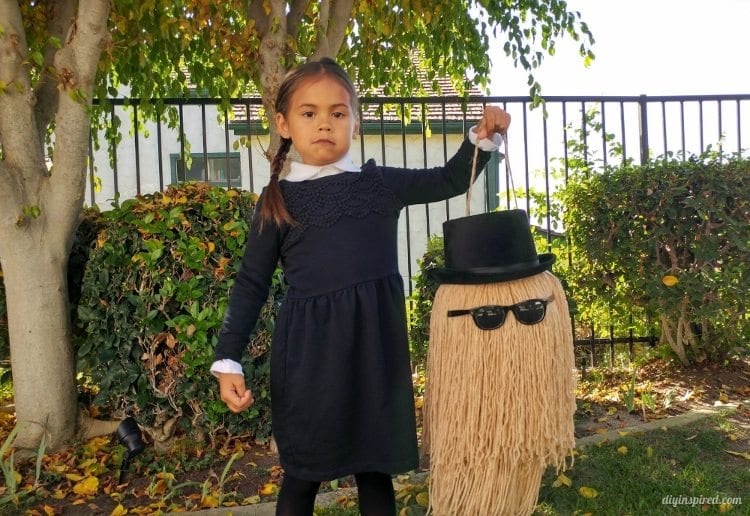
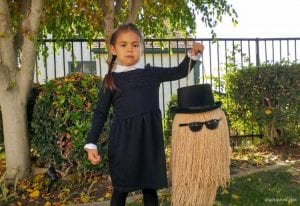
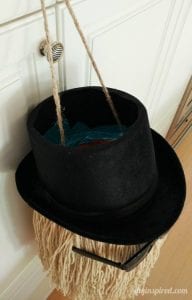
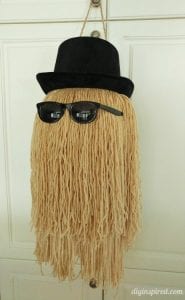 Cut the top off of the top hat. Place it on top of the pumpkin allowing the rope to come through. It will fit snuggly on the pumpkin. Use duct tape to tape the hat to the pumpkin as shown.
Source Article : https://www.diyinspired.com/cousin-diy-trick-treat-pail/ [ ... ]
Cut the top off of the top hat. Place it on top of the pumpkin allowing the rope to come through. It will fit snuggly on the pumpkin. Use duct tape to tape the hat to the pumpkin as shown.
Source Article : https://www.diyinspired.com/cousin-diy-trick-treat-pail/ [ ... ] 

 Supplies: balloon, liquid corn starch, strips of newspaper. And for decorating the piñata after it dries, you will need white paint, tissue paper, black felt, and Elmer’s glue.
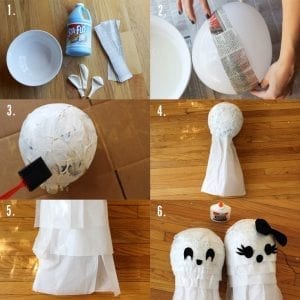 2. Blow up your balloon and begin dipping strips of newspaper in liquid corn starch. Lay the strips on the surface of the balloon (you want the strips wet, but not soggy). Continue doing this until the balloon is totally covered. 3. After your balloon has been drying for about a day, cover the newspaper in a coat of white paint. This will hide any newsprint that may want to peek out. After the paint dries, carefully pop the balloon inside of the newspaper.
4. Begin glueing tissue paper around the base of the balloon. You may need more than on piece to make it wrap all the way around.
5. After you have glued 3 or 4 long tiers on, start back down by the base of the balloon and begin the same process with thinner strips of tissue paper. You will need a large circle to finish off the top. 5. When all of the strips have been glued down, go back to your long layers at the bottom and cut them into fringe.
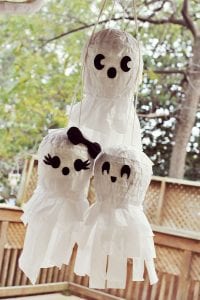
6. Cut faces shapes out of felt and glue them down. You’re all done!
2. Blow up your balloon and begin dipping strips of newspaper in liquid corn starch. Lay the strips on the surface of the balloon (you want the strips wet, but not soggy). Continue doing this until the balloon is totally covered. 3. After your balloon has been drying for about a day, cover the newspaper in a coat of white paint. This will hide any newsprint that may want to peek out. After the paint dries, carefully pop the balloon inside of the newspaper.
4. Begin glueing tissue paper around the base of the balloon. You may need more than on piece to make it wrap all the way around.
5. After you have glued 3 or 4 long tiers on, start back down by the base of the balloon and begin the same process with thinner strips of tissue paper. You will need a large circle to finish off the top. 5. When all of the strips have been glued down, go back to your long layers at the bottom and cut them into fringe.
6. Cut faces shapes out of felt and glue them down. You’re all done!
 Source Article : https://abeautifulmess.com/2012/10/ghost-family-pinata-party.html [ ... ]
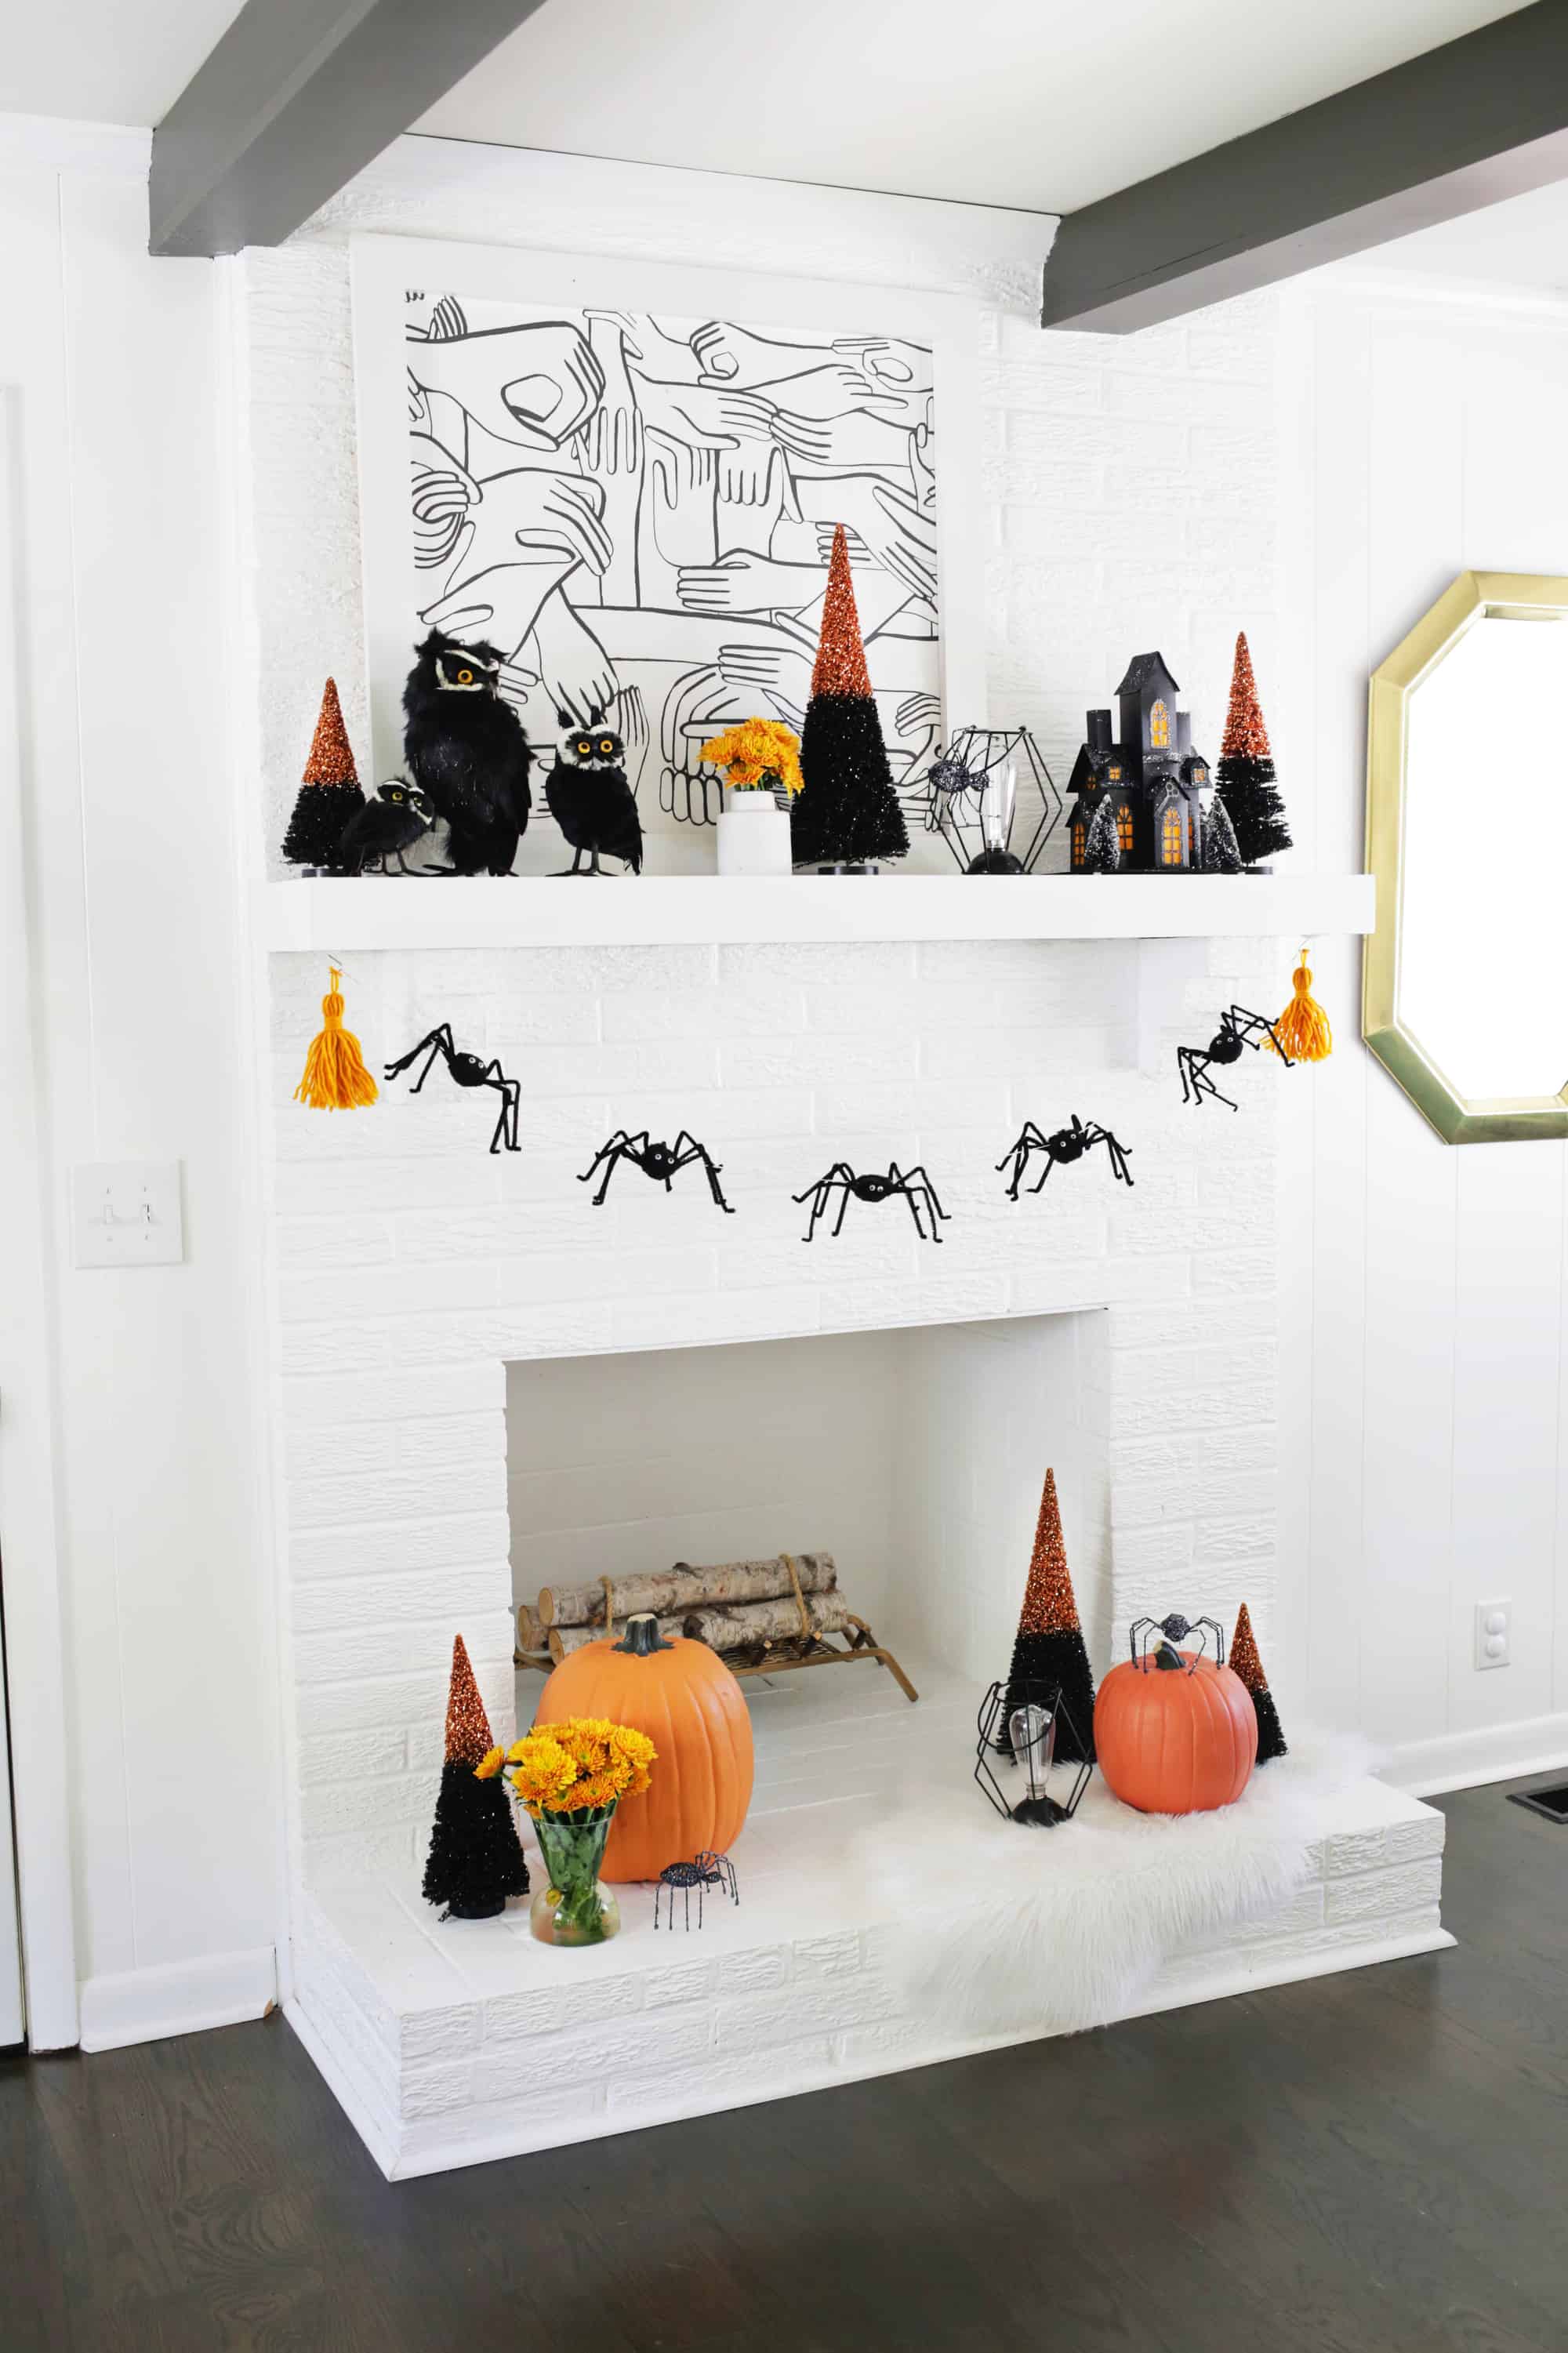
 Supplies:
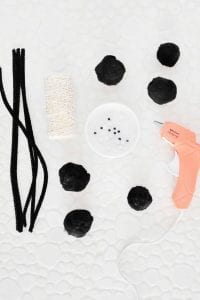
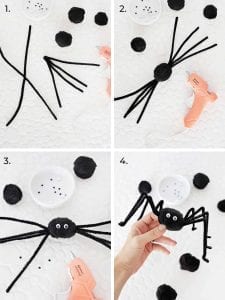
–black pom poms (I used 2″ pom poms but they can be varying sizes)
–black pipe cleaners (4 per spider)
–hot glue gun
–small googly eyes
–bakers twine and large eye needle
–yarn for tassels
Supplies:
–black pom poms (I used 2″ pom poms but they can be varying sizes)
–black pipe cleaners (4 per spider)
–hot glue gun
–small googly eyes
–bakers twine and large eye needle
–yarn for tassels
 First, take two pipe cleaners and twist them together in the middle, creating an “X” shape. Fold the X in half so you have 4 legs of equal length. Repeat with two more pipe cleaners so you have two sets of legs. Next, part the furryness of your pom pom and put a large drop of hot glue near the center. Stick the twisted side of your legs into the glue and allow the glue to set. Repeat on the opposite side with your second set of legs. Next, use a small drop of glue on the back of each googly eye and attach them to your spider face. To finish, bend your legs upwards right next to the base of the pipe cleaners, then bend them back down about 1/3 of the way up the leg. Bend the last 1/2″ of each pipe cleaner back up again to create the feet and repeat on the other side.
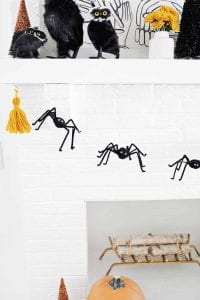
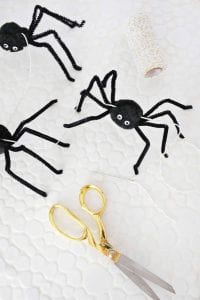 To hang your garland, thread some baker’s twine through a large eye needle and sew through each spider’s core so they are suspended on the string (try and get them near the top of their core so they don’t flip upside down). Once all your spiders are threaded, use some hooks to hang your garland in your desired spot and make some yarn tassels to hang on each end. That’s it!
 Article Source : https://abeautifulmess.com/2018/10/easy-spider-garland-diy.html [ ... ]
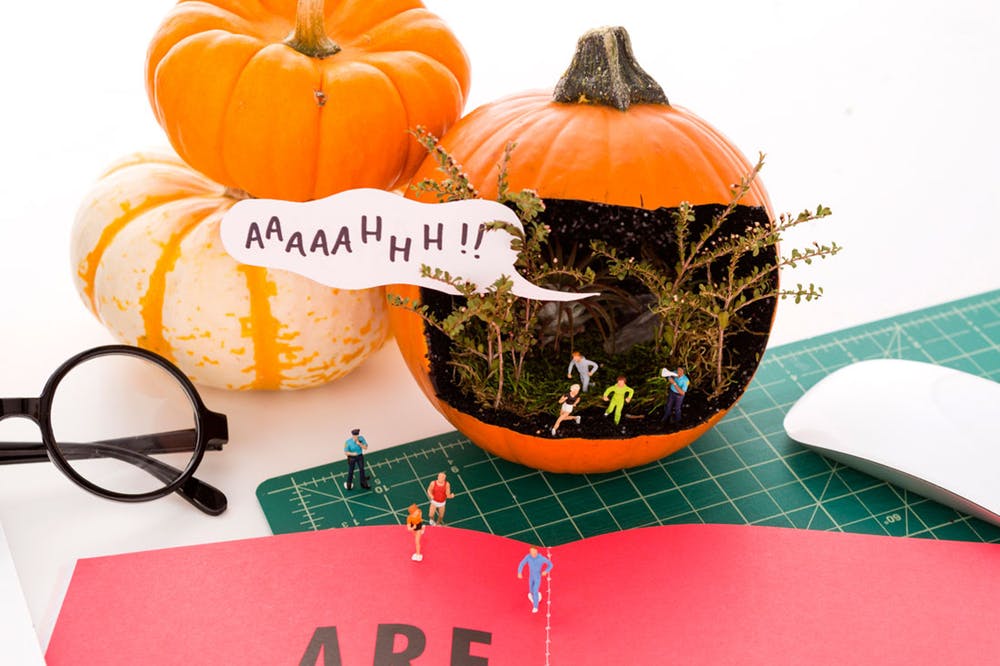
 This tiny pumpkin diorama is the perfect office desk decor. It says “I appreciate Halloween” without completely letting your freak flag fly. Subtlety is key with the ‘ween decor.
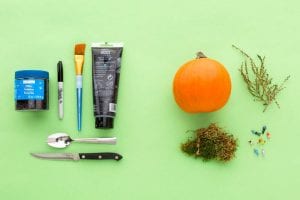 Materials and Tools:
glitter
permanent marker
paint brush
black acrylic paint
spoon
knife
mini pumpkin
moss and dried foliage
model people
Grab your materials. It’s time to whip out those fine motor skills!
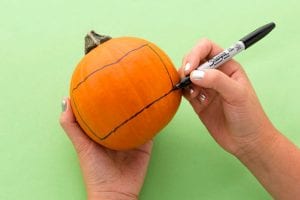
1. Make a rectangle using permanent marker.
Materials and Tools:
glitter
permanent marker
paint brush
black acrylic paint
spoon
knife
mini pumpkin
moss and dried foliage
model people
Grab your materials. It’s time to whip out those fine motor skills!
1. Make a rectangle using permanent marker.
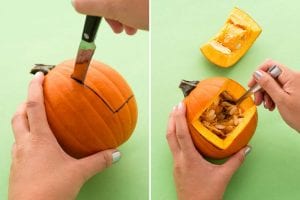
 2. Using a serrated knife, carefully cut along your lines. Remove the seeds with a spoon, making sure to scrape away as much of the loose pumpkin fibers as possible. Pat the inside of the pumpkin dry with a paper towel.
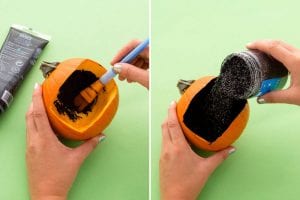
 3. Paint the inside of the pumpkin with the black acrylic paint and add glitter while the paint is still wet. Allow the paint to dry completely (about two hours) before moving onto the next step.
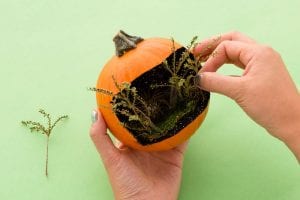
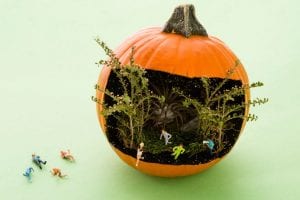
 4. Place a layer of moss on the bottom of the pumpkin and trim your dried botanicals to fit inside of the pumpkin. Pierce twigs into the flesh of the pumpkin to keep them in place.
 5. When you’re happy with your composition, place a few model people into your diorama. I purchased jogging figurines and policemen to create a spooky chase scene.
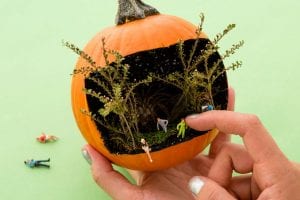 6. That’s all it takes to make a spooky mini Jack-o’-Lantern that’s perfect for your desk.
 Article Source : https://www.brit.co/stranger-things-are-happening-in-this-diy-mini-jack-o-lantern-diorama/ [ ... ]
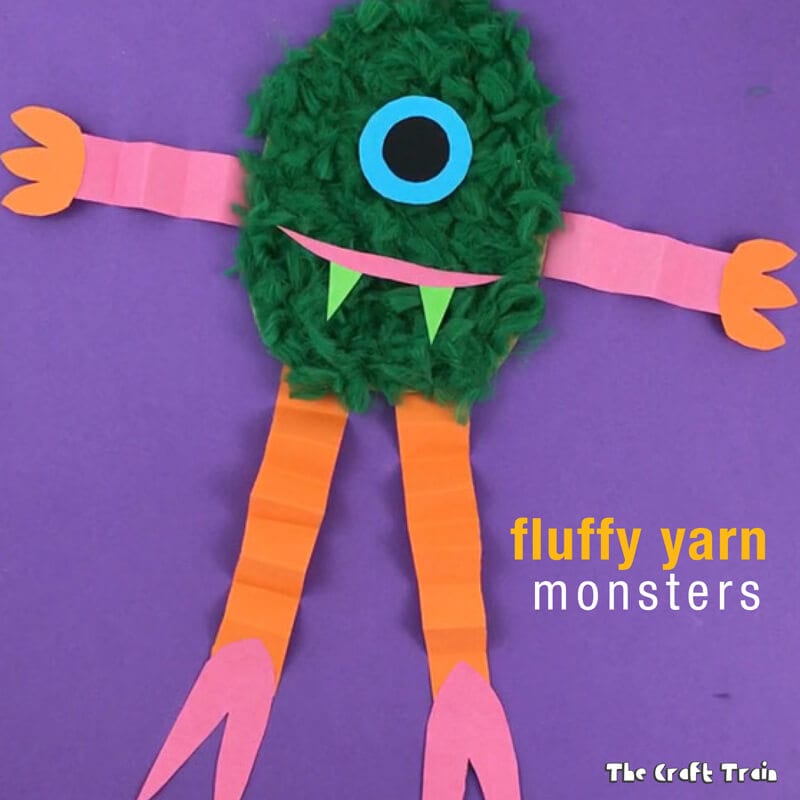
 You will need:
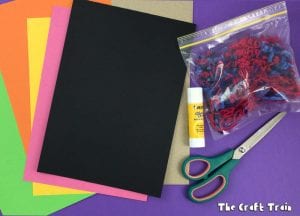
• pom pom trimmings
• scrap heavy cardboard
• construction paper
• a glue stick
• PVA or craft glue
You will need:
• pom pom trimmings
• scrap heavy cardboard
• construction paper
• a glue stick
• PVA or craft glue
 How to:
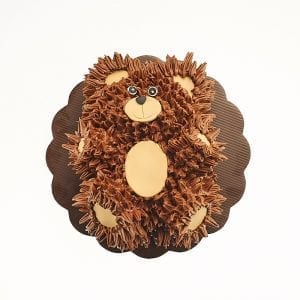
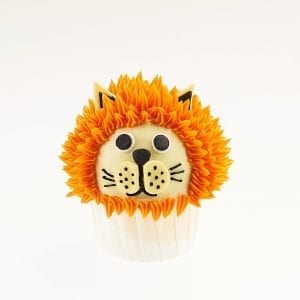
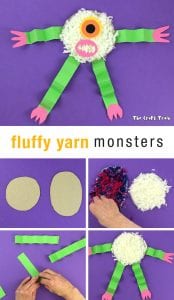
1. Sketch and cut out a circular or oval shape on your piece of scrap cardboard.
2. Spread some craft glue evenly on your cardboard shape, making sure its all covered completely with a paint brush.
3. Spread some pom pom trimmings across the shape evenly, making sure to leave no gaps and go right to the edges. Leave aside to dry.
4. Cut four strips from a sheet of construction paper and fold them backwards and forwards concertina-style to create arms and legs.
5. Cut hand and foot shapes from construction paper and glue to the ends of the strips.
6. Glue the ends of the arms and legs to the reverse side of the fluffy cardboard piece.
7. Cut out three circles, each a different size, and glue on top of each other to create an eye. Make as many eyes as you want and then glue them to the top of the fluff with your glue stick.
8. Cut out a mouth and teeth, and glue to the top of the fluff.
How to:
1. Sketch and cut out a circular or oval shape on your piece of scrap cardboard.
2. Spread some craft glue evenly on your cardboard shape, making sure its all covered completely with a paint brush.
3. Spread some pom pom trimmings across the shape evenly, making sure to leave no gaps and go right to the edges. Leave aside to dry.
4. Cut four strips from a sheet of construction paper and fold them backwards and forwards concertina-style to create arms and legs.
5. Cut hand and foot shapes from construction paper and glue to the ends of the strips.
6. Glue the ends of the arms and legs to the reverse side of the fluffy cardboard piece.
7. Cut out three circles, each a different size, and glue on top of each other to create an eye. Make as many eyes as you want and then glue them to the top of the fluff with your glue stick.
8. Cut out a mouth and teeth, and glue to the top of the fluff.
 Source Article : https://www.thecrafttrain.com/fluffy-yarn-monsters/
[ ... ]
Source Article : https://www.thecrafttrain.com/fluffy-yarn-monsters/
[ ... ] 
 You will need
• heavy recycled cardboard – for example a flap from a cardboard box
• cookie cutters for shapes
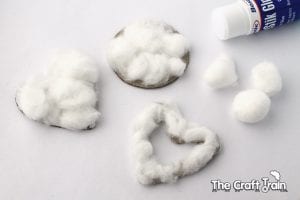
• cotton balls for stuffing
• glue stick
• assorted coloured tissue paper
• brown paper (we used paper bags)
• dark brown construction paper for the choc-chips
• mod podge
• glitter to decorate
• cutting mat and craft knife for the jam tart window
How To
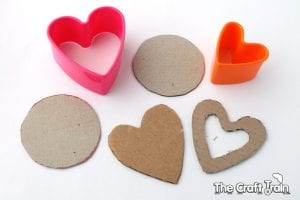
Trace the cookie cutter shapes onto your cardboard and cut them out. To make a heart-shaped tart you will need to cut a window inside one of the heart shapes and cut a second one the same size with no window for the back of the cookie. To cut the window I used a craft knife and cutting mat to make the job easier, but obviously that equipment wouldn’t be safe for a child to use so you would need to do that part for them.
You will need
• heavy recycled cardboard – for example a flap from a cardboard box
• cookie cutters for shapes
• cotton balls for stuffing
• glue stick
• assorted coloured tissue paper
• brown paper (we used paper bags)
• dark brown construction paper for the choc-chips
• mod podge
• glitter to decorate
• cutting mat and craft knife for the jam tart window
How To
Trace the cookie cutter shapes onto your cardboard and cut them out. To make a heart-shaped tart you will need to cut a window inside one of the heart shapes and cut a second one the same size with no window for the back of the cookie. To cut the window I used a craft knife and cutting mat to make the job easier, but obviously that equipment wouldn’t be safe for a child to use so you would need to do that part for them.
 Glue the cotton balls onto the cardboard, you will need to gently pull them apart a bit to get a nice even coverage. When the girls made some cookies they found this bit quite tricky and needed some help, the cotton balls kept sticking to the glue on their fingers (which you can imagine is quite frustrating!).
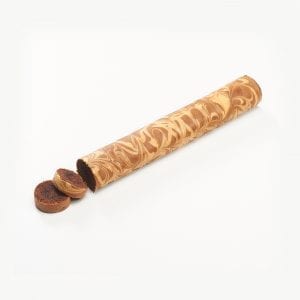
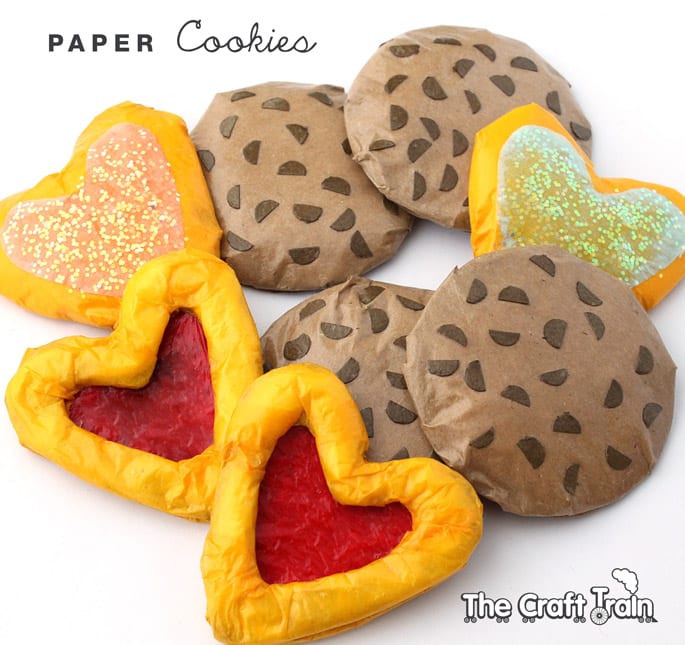
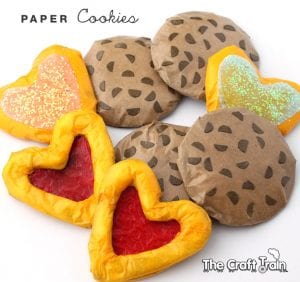
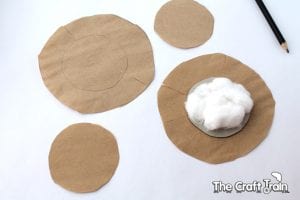
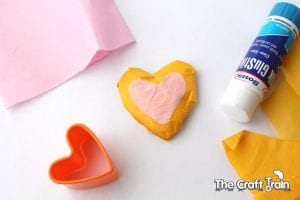
 Now it’s time to wrap the cookies in paper. Sketch around the cookie shape over the paper that you will be using, giving it a fair bit of space to cover the whole cookie like in the picture below. Cut a few slits around the edge. Then turn the cotton ball side so it’s facing down, wrap the cookie and glue the flaps down. This technique goes for any shape of cookie except for the jam tart.
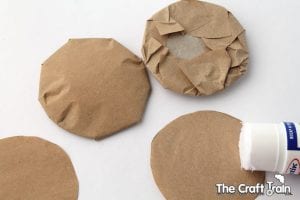
 Once you’ve glued down the flaps, cover the base with a flat piece of the right shape to tidy it up.
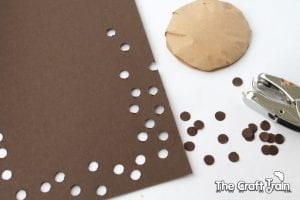
 Make choc-chips by using a hole punch over your dark brown construction paper. Empty out the punched hole circles and cut them in half before gluing onto your cookie.
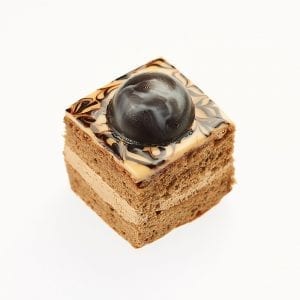
 To create coloured icing cut a smaller shape of the same shape as the cookie (in this case a heart) and stick that on with your glue stick.
 To make the jam tarts I covered the heart-shaped window with multiple small rectangular strips of tissue paper, and the base of the cookie that will be seen through the window with a piece of yellow tissue paper on the back and a piece of red construction paper or similar to make the ‘jam’ on the top (which you see through the window).
Once you have covered all off your ‘cookies’ in paper it’s time to paint them with mod podge for a glossy, protective coating. You might need to paint one side, dry, then turn over and coat the other side. On most of the cookies I made I didn’t bother mod-podging the back since it would take up extra drying time and I know my girls will be careful with them so they shouldn’t get destroyed. To stop the mod podge from sticking to the surface it’s sitting on whilst it’s drying, place it on top of some non-stick baking paper – just like real cookies!
For the hearts that have icing I added an extra coat of mod podge once the first one was dry directly over the piece of icing only, and then sprinkled that liberally with glitter.
The girls really loved these cookies and wanted to have a turn at making some too, so I set the activity up for them again at a later date when I could concentrate on helping and enjoying our crafting time together instead of madly taking photos. They found it tricky in parts but to their credit they both persevered and created some cute little cookies of their own. If you have younger children I’d recommend keeping the shapes simple (like circles or rectangles) because the stars and hearts are fiddly and it might be a bit too hard for little fingers.
Source Article : https://www.thecrafttrain.com/paper-cookies/ [ ... ]
To make the jam tarts I covered the heart-shaped window with multiple small rectangular strips of tissue paper, and the base of the cookie that will be seen through the window with a piece of yellow tissue paper on the back and a piece of red construction paper or similar to make the ‘jam’ on the top (which you see through the window).
Once you have covered all off your ‘cookies’ in paper it’s time to paint them with mod podge for a glossy, protective coating. You might need to paint one side, dry, then turn over and coat the other side. On most of the cookies I made I didn’t bother mod-podging the back since it would take up extra drying time and I know my girls will be careful with them so they shouldn’t get destroyed. To stop the mod podge from sticking to the surface it’s sitting on whilst it’s drying, place it on top of some non-stick baking paper – just like real cookies!
For the hearts that have icing I added an extra coat of mod podge once the first one was dry directly over the piece of icing only, and then sprinkled that liberally with glitter.
The girls really loved these cookies and wanted to have a turn at making some too, so I set the activity up for them again at a later date when I could concentrate on helping and enjoying our crafting time together instead of madly taking photos. They found it tricky in parts but to their credit they both persevered and created some cute little cookies of their own. If you have younger children I’d recommend keeping the shapes simple (like circles or rectangles) because the stars and hearts are fiddly and it might be a bit too hard for little fingers.
Source Article : https://www.thecrafttrain.com/paper-cookies/ [ ... ]