Kali ini kita mau kasih tips untuk acara Bridal Shower dirumah nih,
kamu tidak perlu bingung dan ribet untuk itu, dengan mempertimbangkan
budget yang akan dikeluarkan, kamu bisa bikin acara bridal shower dirumahmu.
Bikin rumahmu senyaman mungkin dan enjoy selama acara berlangsung.
Trendiest Birthday Party Themes
Categories:
Inspiration
Berikut ini terdapat beberapa inspirasi tema untuk acara ulang tahun anak anda. Yuk coba salah satu agar acara ulang tahun tampak beda dan lebih fun.
Llamas!!
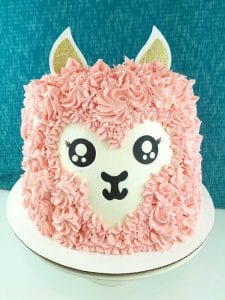 If 2016 was the year of the woodland creature and 2017 the year of the flamingo, then 2018 is the year of the llama (and also, maybe the sloth).
Jurassic World Party
 With Jurassic World hitting the theaters soon, expect to see an above average number of dino bashes on the party circuit this summer. We love these ideas from Jessie's Party Stop, including a dino egg hunt, paper vines and obstacle course!
Next-Level Princess Parties
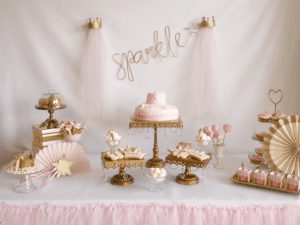 There are three secret ingredients to pulling this party off: tulle, gold glitter and a princess kit cake.
Minions
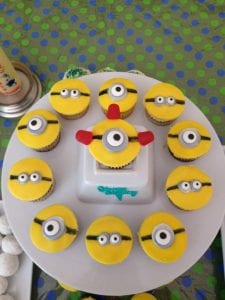 Everyone loves those crazy minions, so throw a party where they can shine as bright as your bitty birthday star! Yellow foods galore—pineapple, bananas, popcorn—will be fun to snack on as your party guests don silver goggles or even yellow hard hats!
Superhero Party
 Set out different superhero costumes, and let your guests choose their powerful persona upon arrival or have them come dressed as their favorite superhero!
Star Wars
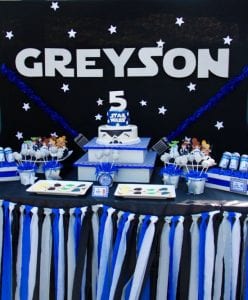 The Star Wars franchise may be decades old, but the force is still going strong thanks to The Last Jedi and its newest generation of rebel fighters. Young Jedi will love this party plan that includes DIY lightsabers, a droid-decorating station, and a Death Star piñata.
http://redtri.com/most-popular-birthday-party-themes/slide/2 [ ... ]
Read More
 If 2016 was the year of the woodland creature and 2017 the year of the flamingo, then 2018 is the year of the llama (and also, maybe the sloth).
Jurassic World Party
 With Jurassic World hitting the theaters soon, expect to see an above average number of dino bashes on the party circuit this summer. We love these ideas from Jessie's Party Stop, including a dino egg hunt, paper vines and obstacle course!
Next-Level Princess Parties
 There are three secret ingredients to pulling this party off: tulle, gold glitter and a princess kit cake.
Minions
 Everyone loves those crazy minions, so throw a party where they can shine as bright as your bitty birthday star! Yellow foods galore—pineapple, bananas, popcorn—will be fun to snack on as your party guests don silver goggles or even yellow hard hats!
Superhero Party
 Set out different superhero costumes, and let your guests choose their powerful persona upon arrival or have them come dressed as their favorite superhero!
Star Wars
 The Star Wars franchise may be decades old, but the force is still going strong thanks to The Last Jedi and its newest generation of rebel fighters. Young Jedi will love this party plan that includes DIY lightsabers, a droid-decorating station, and a Death Star piñata.
http://redtri.com/most-popular-birthday-party-themes/slide/2 [ ... ]
Kalian ingin mengadakan Bridal Shower tapi tidak ada ide agar acaranya fun dan tidak monoton? Beberapa games di bawah ini bisa jadi inspirasi kalian
[ ... ]
Read More
Locked Lips
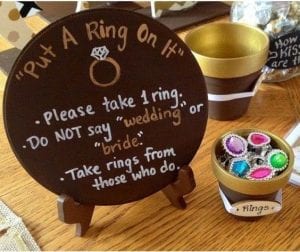 This time "locking lips" has nothing to do with kissing and everything to do with watching your words. Hand each of the girls a plastic ring as they arrive and inform them that if they want to keep it, they will have to refrain from using the chosen words. "Wedding" or "bride" are popular choices, especially on a night like this!
 This time "locking lips" has nothing to do with kissing and everything to do with watching your words. Hand each of the girls a plastic ring as they arrive and inform them that if they want to keep it, they will have to refrain from using the chosen words. "Wedding" or "bride" are popular choices, especially on a night like this!
Categories- Wedding!
 Time to see who is quick on their feet and who has weddings on the brain. Create a stack of cards with wedding categories on them likeflowers, dress, gift, party, veil, décor, music, etc. and have them facedown. Now while in a circle, let the first player hold the stack and draw the top card. She has 5 seconds to come up with a word that fits in the category and then pass the deck to her right. If she can't handle that, she has to leave the circle. Afterwards, the next player pulls the top card and answers that category, and so on.
 Time to see who is quick on their feet and who has weddings on the brain. Create a stack of cards with wedding categories on them likeflowers, dress, gift, party, veil, décor, music, etc. and have them facedown. Now while in a circle, let the first player hold the stack and draw the top card. She has 5 seconds to come up with a word that fits in the category and then pass the deck to her right. If she can't handle that, she has to leave the circle. Afterwards, the next player pulls the top card and answers that category, and so on.
Cold Feet
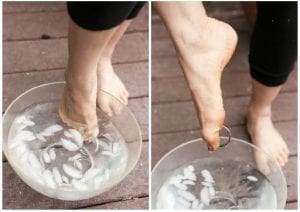 You probably never thought of this term literally, but it is an idea for a great game. Fill a big bowl or bucket with ice water and drop in some grabbable items like big rings or wedding-related figurines. Now each guest has a chance to dip her feet in and pull out the items as quickly as possible. Time the ladies and see who can handle cold feet best—we hope it's the bride!
 You probably never thought of this term literally, but it is an idea for a great game. Fill a big bowl or bucket with ice water and drop in some grabbable items like big rings or wedding-related figurines. Now each guest has a chance to dip her feet in and pull out the items as quickly as possible. Time the ladies and see who can handle cold feet best—we hope it's the bride!
Put a Ring on it!
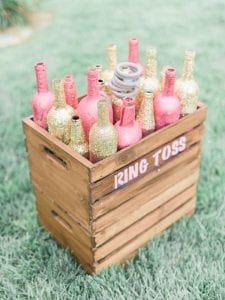 Challenge your best girls to a bridal version of horseshoes ("Single Ladies" as background music is optional). Set up some decorated bottles (wine bottles look nice) and start throwing some large rings,
 Challenge your best girls to a bridal version of horseshoes ("Single Ladies" as background music is optional). Set up some decorated bottles (wine bottles look nice) and start throwing some large rings,
hoping to "ring" as many bottles as possible. The lady with the best aim wins!
http://www.mywedding.com/wedding-ideas/showers-parties/fun-classy-bachelorette-party-game-ideas/
Kalau kalian ingin mengadakan party sederhana di rumah tanpa perlu mengeluarkan biaya yang besar dan pesta tetap seru? Coba tipsnya di bawah ini
Eat the doughnut
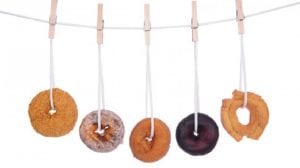 The object of this game is to eat a dangling doughnut with no hands! To play: hang doughnuts on strings from a high place, such as a doorway or tree branch. This game can be played in two ways.
You could have the kids try to eat their donuts individually, one at a time, or if you have room, it could be played as a race to see who finishes their doughnut first. Have at least one doughnut per party-goer plus a few extra. Frosted chocolate donuts produce the messiest — and funniest — results. Have a package of moist towelettes handy for the aftermath!
Streamer fashion show

Give each guest a roll of paper party streamers (or even toilet paper!) and some clear tape. To play: tell the guests that they have 20 minutes to make an outfit for themselves. When everyone is finished, put on some music and let them “walk the runway.”
Ask each kid to name their creation (such as toga or mummy). Announce each model as they strut down the catwalk and strike a pose! Give prizes for the silliest, most creative, etc.
Blind makeover
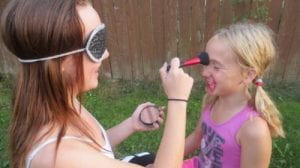

Group kids into pairs and give them a few cosmetics such as blush, powder and lipstick. Blindfold one guest in each pair and have the blindfolded one apply makeup to the other’s face. Then, switch roles so that everyone gets a makeover. Be sure to have baby wipes or make-up removal cloths on hand for after the game is concluded!
https://www.parentmap.com/article/best-outdoor-indoor-party-games/19#pager-content
Menjadi calon ibu adalah saat yang sangat membahagiakan, tidak ada salahnya untuk merayakannya dengan mengadakan Baby shower party. Berikut ini DIY Oh Baby Tablecloth for Baby Shower yang data kalian coba.
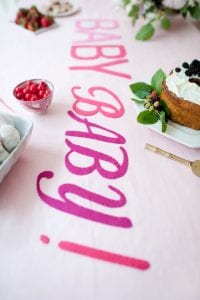

 http://ohhappyday.com/2014/06/oh-baby-tablecloth-diy/


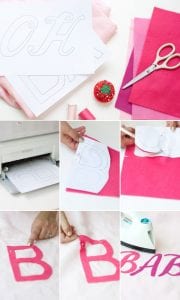
Materials: 2 yards linen (I used Pink from Gray Line Linen), different shades of pink felt, scissors, Oh Baby Tablecloth Template, straight pins, threads and needle, iron.
Step 1: Print out letters Oh Baby Tablecloth Text.Step 2: Cut apart the template and pin letters to pieces of felt.
Step 3: Carefully cut on outlines (I connected some letters in places there were gaps). Remove paper as you cut.
Step 4: Place the felt letters on the linen, and thoroughly pin each letter in place.
Step 5: Sew each letter on with matching thread.
Step 6: Gently iron to get creases out.
Kalian akan mengundang teman-teman kalian untuk menjadi bridesmaid tapi bingung mau memberi kado apa? Tidak perlu bingung, coba DIY simple di bawah ini, selain mudah akan bermanfaat.
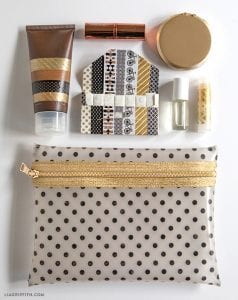
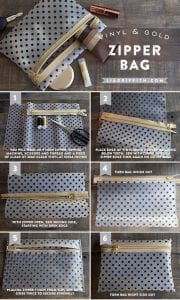
https://liagriffith.com/make-a-pretty-zipper-bag-for-your-beauty-items/?sscid=b1k2_889qh


Hampir semua ibu hamil sekarang ini mengadakan baby shower untuk menyambut kelahiran sang bayi. Selain sebagai ucapan syukur karena kehamilannya, baby showerjuga mejadi ajang untuk kumpul dengan orang-orang tersayang. Biasanya acara ini identik dengan dekorasi lucu, makanan lezat dan kado. Kalau kalian bosan dengan pilihan kado yang itu-itu saja, coba bikin DIY kado lucu berikut ini yuk.
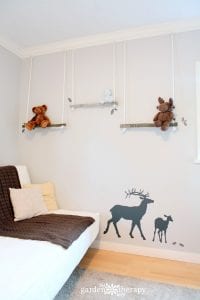
Materials
https://gardentherapy.ca/branch-swing-shelves/
- 1 1/2′′ – 2′′ diameter branches
- Hand saw
- Electric drill with various size bits
- Solid 5/8′′ braided rope
- Masking tape
- Screws
- Choose branches that are fairly straight and even in diameter and cut the ends with a hand saw to the desired length. It’s best that you choose dry wood for this project, so if you collect some fresh branches, let them dry first.
- Using a small drill bit, drill a pilot hole through both ends of the branch, about 2′′ from the end.
- Using a larger drill bit, drill a larger hole through the end where you made your pilot hole. Keep making the hole larger until you have enough space for your rope to feed through.
- Cut the rope to the length that you want to hang the swing, then add about 14′′ to accommodate for the knots at the ends. Wrap masking tape around the end of the rope to prevent fraying and allow you to smoothly feed the rope through the branch.
- Thread two lengths of rope through both sides the branch and tie the ends in knots.
- To hang, insert screws through the top knots and use the drill to secure them into the wall near the ceiling or moldings. Please note that while they are screwed into the wall, they are only held by a knot in the rope. If you pull on one it will come down. If you are securing these to walls where there are young children, ensure that they will break away with a little force. I don’t intend for mine to hold anything heavy, so if a little person grasps on, they are going to release from the wall.
- Adjust the height and level of the swings by adjusting the bottom knots until you are happy with the look. Remove masking tape and fray the ends of the rope a little.
- Style branch swings by hanging stuffed toys, hats, clothes, books, magazines, or artwork. Personalizing and changing the swings will keep them fun and fresh.
How to Make a Baby Shower Banner
Categories:
Inspiration
Baby shower merupakan sebuah bentuk perhatian yang ditujukan kepada calon ibu dari para kerabatnya yang turut berbahagia dalam menunggu kelahiran bayinya. Anda juga bisa melakukan pesta baby shower ini sebagai bentuk kasih sayang kepada kerabat. Namun, tidak ada salahnya mencoba bukan? Yuk coba ide decor baby shower party di bawah ini
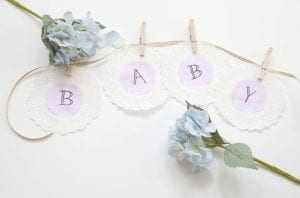 For this craft, you will need the following supplies:
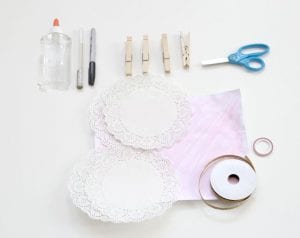 Scissors
Craft paper or decorated card stock
Doilies (one for each letter)
Pens for lettering or alphabet stamps
Craft glue
Clothespins
Washi tape
Ribbon
Your banner can simply read “Baby,” or perhaps you want to try a phrase such as “It’s a Girl!” or “It’s a Boy!” Now is the time to figure out just what your banner should say.
If you are making the banner for a friend and you know the baby’s sex, feel free to use colors to fit the baby shower. You can use pre-decorated craft paper or make your own with card stock and watercolor paints.
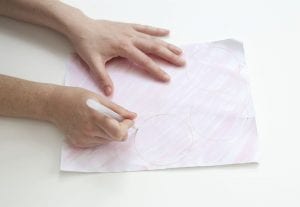
You will need one doily and one circle of card stock per letter. The circles you draw should measure to fit the inside of the doily. For the doilies featured in this project, the circles had a diameter of 3-1/2 inches.
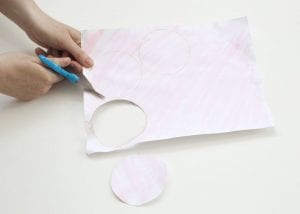
Use scissors to cut out the circles of your craft paper or decorated card stock. For our decorated paper, we used watercolors to paint the background.
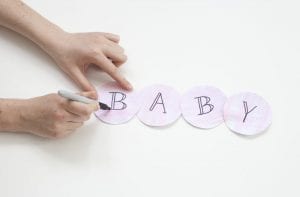
If you are good at calligraphy, now is the time to show off your fancy letter work! Use a pen or marker in a bold or contrasting color to write one letter on each of your circles. For our banner, we wrote the letters by hand without a stencil.
If you’re letter work needs assistance: Use a computer to find a font you feel comfortable tracing and print out the letters. Having a guide will help you achieve the look of a stamp or professional quality.
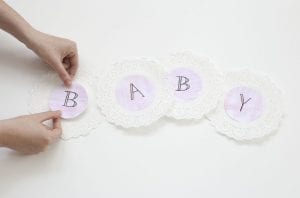
Once your craft paper circles have been lettered, use glue (white, clear, or a glue-stick) to adhere them to the center of your doily. Allow to dry.
Tip: Use a thin layer of glue so that the delicate doily paper doesn’t get saturated and tear.
Do you want to hang your banner in a doorway, over a fireplace mantel, on a wall, or in a nursery? The length of the ribbon you use to hang your banner will depend on where you want it to go. Cut your ribbon accordingly.
You will need to use one clothespin per letter to attach your doilies to the ribbon. If you want to add something extra to your banner, feel free to decorate the clothespins. We recommend using washi tape or acrylic paint to add another pop of color, or a strip of lace to achieve a sweet-as-can-be look. It can be as subtle or bold as you want!
 Source Article : https://www.thesprucecrafts.com/diy-baby-shower-banner-4169501
[ ... ]
Read More
 For this craft, you will need the following supplies:
 Scissors
Craft paper or decorated card stock
Doilies (one for each letter)
Pens for lettering or alphabet stamps
Craft glue
Clothespins
Washi tape
Ribbon
Your banner can simply read “Baby,” or perhaps you want to try a phrase such as “It’s a Girl!” or “It’s a Boy!” Now is the time to figure out just what your banner should say.
If you are making the banner for a friend and you know the baby’s sex, feel free to use colors to fit the baby shower. You can use pre-decorated craft paper or make your own with card stock and watercolor paints.
You will need one doily and one circle of card stock per letter. The circles you draw should measure to fit the inside of the doily. For the doilies featured in this project, the circles had a diameter of 3-1/2 inches.
Use scissors to cut out the circles of your craft paper or decorated card stock. For our decorated paper, we used watercolors to paint the background.
If you are good at calligraphy, now is the time to show off your fancy letter work! Use a pen or marker in a bold or contrasting color to write one letter on each of your circles. For our banner, we wrote the letters by hand without a stencil.
If you’re letter work needs assistance: Use a computer to find a font you feel comfortable tracing and print out the letters. Having a guide will help you achieve the look of a stamp or professional quality.
Once your craft paper circles have been lettered, use glue (white, clear, or a glue-stick) to adhere them to the center of your doily. Allow to dry.
Tip: Use a thin layer of glue so that the delicate doily paper doesn’t get saturated and tear.
Do you want to hang your banner in a doorway, over a fireplace mantel, on a wall, or in a nursery? The length of the ribbon you use to hang your banner will depend on where you want it to go. Cut your ribbon accordingly.
You will need to use one clothespin per letter to attach your doilies to the ribbon. If you want to add something extra to your banner, feel free to decorate the clothespins. We recommend using washi tape or acrylic paint to add another pop of color, or a strip of lace to achieve a sweet-as-can-be look. It can be as subtle or bold as you want!


 Source Article : https://www.thesprucecrafts.com/diy-baby-shower-banner-4169501
[ ... ]
Sebelum halloween tiba, tidak ada salahnya untuk membuat kerajinan tangan bersama anak, selain membuat anak makin kreatif tentunya akan menambah quality time bersama anda
 This materials list contains affiliate links for products I recommend.
•Plastic Trick or Treat Pumpkin
•Rope
•Tan Yarn
 •Light Colored Duct Tape
•Masking Tape
•Black Top Hat
 •Black Sunglasses
•Scissors
•Hot Glue and Glue Gun
Cut off the existing black plastic handle on the pumpkin. Replace it with rope. Measure it, depending on the height of your child.
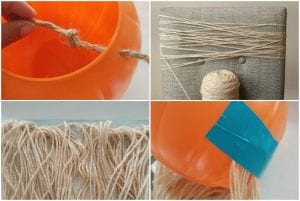 Next, unwind the spool of yarn around a chair back several times. Pull it off and cut only one end.
Lay out a piece of duct tape about 10” long. Lay the looped end of the yarn onto the duct tape.
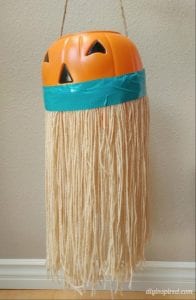 Tape it around the mid-section of the pumpkin.
Repeat these steps and do the other side.
 Note: I happen to have blue duct tape, so that’s what I used. I would recommend choosing a light colored duct tape so that it doesn’t show through the yarn.
Repeat the steps above again, but in shorter strips of duct tape. This time, tape them around the rim of the pail.
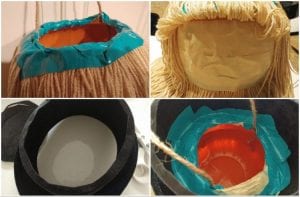
 Next, lift up the first layer and cover the face with masking tape. This will help hide the face behind the yarn. For mine, I also covered the blue duct tape with masking tape.
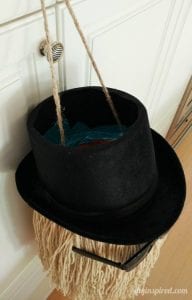
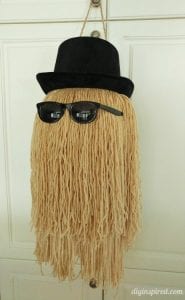 Cut the top off of the top hat. Place it on top of the pumpkin allowing the rope to come through. It will fit snuggly on the pumpkin. Use duct tape to tape the hat to the pumpkin as shown.
Source Article : https://www.diyinspired.com/cousin-diy-trick-treat-pail/ [ ... ]
Read More
 This materials list contains affiliate links for products I recommend.
•Plastic Trick or Treat Pumpkin
•Rope
•Tan Yarn
 Next, unwind the spool of yarn around a chair back several times. Pull it off and cut only one end.
Lay out a piece of duct tape about 10” long. Lay the looped end of the yarn onto the duct tape.
 Tape it around the mid-section of the pumpkin.
Repeat these steps and do the other side.
 Note: I happen to have blue duct tape, so that’s what I used. I would recommend choosing a light colored duct tape so that it doesn’t show through the yarn.
Repeat the steps above again, but in shorter strips of duct tape. This time, tape them around the rim of the pail.
 Next, lift up the first layer and cover the face with masking tape. This will help hide the face behind the yarn. For mine, I also covered the blue duct tape with masking tape.
 Cut the top off of the top hat. Place it on top of the pumpkin allowing the rope to come through. It will fit snuggly on the pumpkin. Use duct tape to tape the hat to the pumpkin as shown.
Source Article : https://www.diyinspired.com/cousin-diy-trick-treat-pail/ [ ... ]
 Halloween Party Shopping Guide!
Categories:
Inspiration
Kalau anda ingin merayakan pesta halloween sendiri di rumah coba ikuti tips belanja untuk pesta halloween di bawah ini
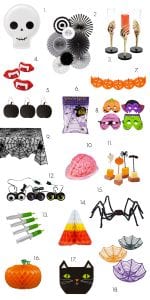 1. These adorable skull plates will not only decorate your table, but they'll also hold your spider-shaped appetizers as well.
2. Party fans are a quick way to make the perfect photo booth or dessert table backdrop. Just open and pin in place!
3. How about serving your Bloody Marys in one of these amazingly creepy glasses.
4. Wax lips (with vampire teeth!) are a must have for a photo booth prop.
5. Label your tasty confections with these cute mini pumpkin chalkboards.
6. The spider web-in-a-bag is a classic Halloween decoration that never goes out of style—perfect for a haunted entryway!
7. Hanging garlands is another easy way to add some color and texture to the party without a lot of effort.
8. In case your gang isn't the "full costume type", providing a few masks will give off a spooky vibe with minimal dress-up effort.
9. Make your tablescape scream Halloween vibes with this lace spiderweb tablecloth.
10. For the especially daring, try your hand at a ghoulish dessert with a jello brain mold!
11. Even your cheese tray can get into the spirit of things with these toothpicks.
12. These flashing light-up eyes would be perfect entangled in some spiderwebs in a dark corner (or maybe just peeking out of the chip bowl).
13. While I'm a fan of the classic "jello shot in the test tube" for a Halloween party, try something new by serving them in a syringe instead!
14. What's not to love about a giant candy corn?!
15. Were you thinking your party didn't need a 4 foot wide spider with eyes that glow?? Think again!
16. Honeycomb decorations are a great way to add some 3D color and texture to your party decor (assembly is so easy too!).
17. This black cat napkin can cross my path any day of the week—meow!
18. Spider web bowls are perfect for chips and popcorn (or fill them with fun sized Kit Kats please!).
Looks like all the ingredients for a great party if you ask me! While there's still plenty of time left to find the perfect creepy and cute additions for your big
Source Article : abeautifulmess.com/2016/10/halloween-party-shopping-guide.html [ ... ]
Read More
 1. These adorable skull plates will not only decorate your table, but they'll also hold your spider-shaped appetizers as well.
2. Party fans are a quick way to make the perfect photo booth or dessert table backdrop. Just open and pin in place!
3. How about serving your Bloody Marys in one of these amazingly creepy glasses.
4. Wax lips (with vampire teeth!) are a must have for a photo booth prop.
5. Label your tasty confections with these cute mini pumpkin chalkboards.
6. The spider web-in-a-bag is a classic Halloween decoration that never goes out of style—perfect for a haunted entryway!
7. Hanging garlands is another easy way to add some color and texture to the party without a lot of effort.
8. In case your gang isn't the "full costume type", providing a few masks will give off a spooky vibe with minimal dress-up effort.
9. Make your tablescape scream Halloween vibes with this lace spiderweb tablecloth.
10. For the especially daring, try your hand at a ghoulish dessert with a jello brain mold!
11. Even your cheese tray can get into the spirit of things with these toothpicks.
12. These flashing light-up eyes would be perfect entangled in some spiderwebs in a dark corner (or maybe just peeking out of the chip bowl).
13. While I'm a fan of the classic "jello shot in the test tube" for a Halloween party, try something new by serving them in a syringe instead!
14. What's not to love about a giant candy corn?!
15. Were you thinking your party didn't need a 4 foot wide spider with eyes that glow?? Think again!
16. Honeycomb decorations are a great way to add some 3D color and texture to your party decor (assembly is so easy too!).
17. This black cat napkin can cross my path any day of the week—meow!
18. Spider web bowls are perfect for chips and popcorn (or fill them with fun sized Kit Kats please!).
Looks like all the ingredients for a great party if you ask me! While there's still plenty of time left to find the perfect creepy and cute additions for your big
Source Article : abeautifulmess.com/2016/10/halloween-party-shopping-guide.html [ ... ]


